Tuesday, November 29, 2016

Review: O-scale - 3rd Rail/Sunset Models - Southern SD9

I received my two models today after a bit of runaround with UPS and hope to never have to deal with that mess again. At least Scott requires a signature and these won't get left in the rain or on the porch for someone to steal.

I was pretty excited to see them, considering the several rounds of input I gave their graphic artist, Jonathan, to make sure these were right.  I see that most of the input was taken and only a few flaws and inaccuracies (which are more than likely the factory's fault) remain. If someone has further issues with the paint job, I suppose the blame is on me, but photos of every unit showed something different and the factory only paints things "one way".

I do plan to take video of these units running under DCC in the future, but I have no track set up at this time to do this.

I also plan to produce a series of videos on how to reprogram a QSI locomotive's firmware to Q3, as well as play with the various CV settings.  Look for that sometime in 2017.  I believe these are the last 2R units from Sunset to come with the Q2 files loaded into the DCC decoder.  The next engines will have Q3 files, which have much better sounds, as well as let the user select 1 of 120+ horns (and 1 of 23 bells) by changing just one CV.  Super cool! In any case, if you have QSI Titan decoders and you do not want them, I would purchase them.

Note, the review is not to be overly critical of Sunset or Scott, but examine various items that modelers look at when they look over a model. The closest I got to counting rivets was wondering why one of the door latches on the fireman side was lower than the rest, but supposedly there was a picture of this on one unit, so the tooling stayed that way, though I think that one latch in that one photo was different from the mainstream. Oh well.

Here's a photo essay of what one would see as they received their package from Sunset and unboxed their units...image not big enough?  Click each one to enlarge it.

Open the UP end and you'll see a 2R manual.  Underneath the white styrofoam lays a well-packed yellow and black 3rd Rail box.
 

This is the box end for the first model.  Looks like Central of Georgia (Peterson Supply company custom run) and Black River and Western (I hear former employees wanted these) were extra paint schemes listed that were not reservable by regular customers.


 Inside the yellow/black box is your typical styrofoam container.


Inside the styrofoam is a well-packed train.  Use the red ribbons to help lift the model out of the styrofoam...there is foam and cardboard on the top/bottom of the unit, so nothing will damage the locomotive.

Perhaps Scott has a good reason to tape the foam wrapping, but I find it really unnecessary and a nuisance to have to cut open.  There is a risk the blade can go through the foam and damage the shell. MTH and Lionel don't do this and don't have any problems.

There was foam everywhere to protect everything, even the step wells.  Really nicely done.  There was a foam piece with cutouts for the roof too not seen in the photo.

Oh no, a screw fell out as I took the engine out of its foam cradle.  Luckily it was a very easy to spot hole in the truck and I put it back in with no problem.

Here is a parts goodie bag.  Not sure what the screws are for exactly (would have been nice to have that in the manual), but there is also the magnetic bar used to change the volume and reset the locomotive for those who don't have DCC.

Let's start with a nice shot of the cab.  Paint is relatively crisp and matches the artwork Jonathan did up. And I just realized the middle step on my units were glued into the wrong place.  I was able to easily take one off, but it left glue residue.  I will need to remove all of these middle steps, file/sand down the glue residue, repaint, re-add steps, and weather. An unfortunate mistake by the factory that was missed at QA.

Roof Shot. Everything laid out well.  These units prototypically had:
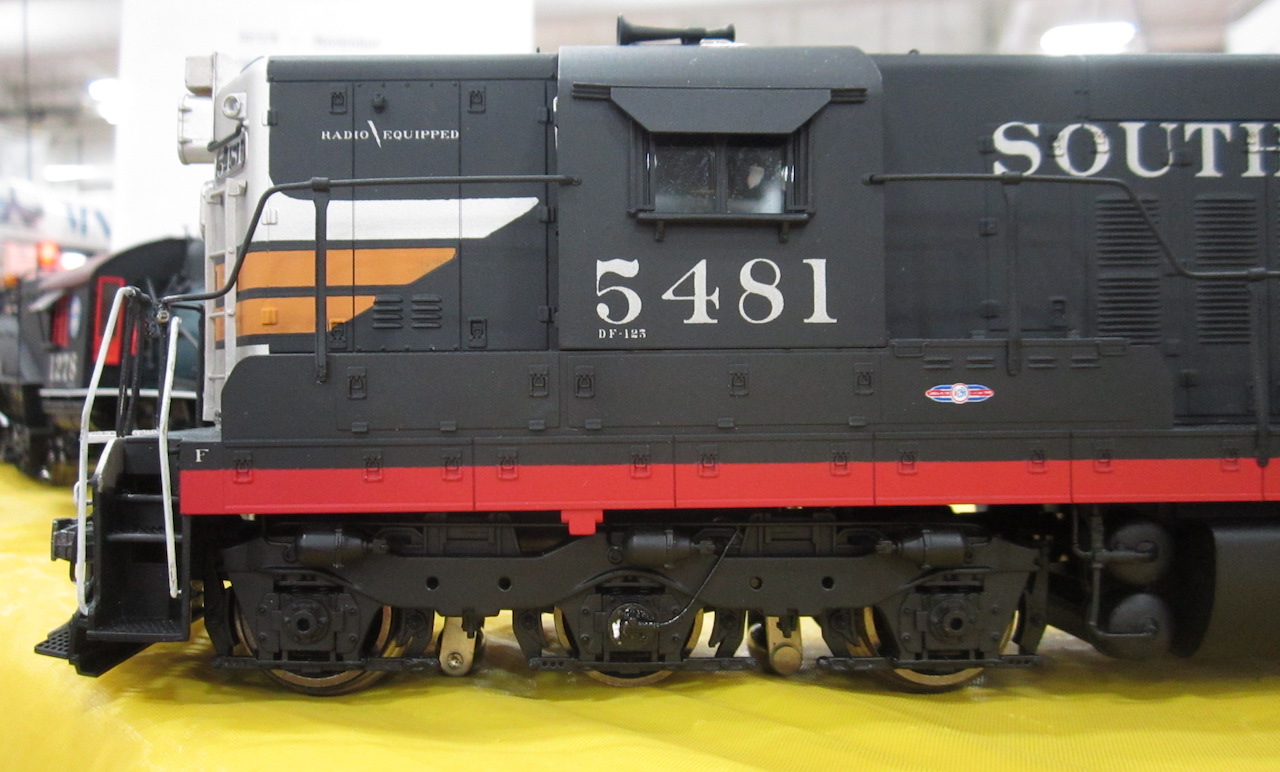
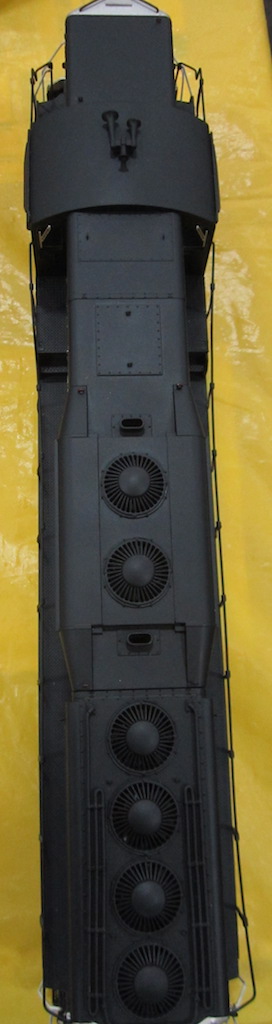
  • Spark arrestors over their stacks, 
  • a firecracker antenna up front, and
  • two horns, a Leslie A-200 and Nathan M-5. I plan to replace the M5 with a cal-scale casting for further accuracy.

Here are both broadside views of the locomotive's fireman and engineer's sides. The bell is higher than the antenna, which is good from photos I referenced. The wrongly-placed steps stick out in this image. 

Here are the front and rear images together.
  • Note the correct SD9 markers. 
  • Jonathan thankfully and correctly fixed the tiger striping to not cover the MU boxes and the handrail colors/coloring (to make them white and only white in certain parts).
  • The bell looks real good.  They were reused from old Southern steam locomotives. 
  • The missing ladder on the right side is also prototypical.
  • The grab-iron at the top of that side should also be missing.
  • The numberboards should have the numbers written from the outside edge instead of centered, but I guess the factory didn't understand that request either.
  • The bell should be black.  The artwork is right, but the factory didn't listen again?  Le sigh.

 
Looks like someone left their inspection sticker on one of my two models. It came off without a problem.

This grab-iron should have never been added, but my guess is that the factory didn't understand the direction given. Not super happy this happened, but I plan to remove this, fill the holes, and sand off the NBW castings.

The bell does look good though.  Should be black though.

This is 3rd rail's attempt at spark arrestors.  They look good for the general shape, however the smooth surfaces should all be wire screened, which are not on these models. I plan to replace these with my own brass versions.

One of my couplers was not properly installed or came loose in shipping.  That's okay, they're 805's.  I will replace with the nicer 745's, as I do on all of my locomotives.

 Locomotive #2's box after it was removed from the shipping box.

The firecracker antenna was found bent.  Luckily it bent back into shape without breaking.

Good thing for all of the foam.  The rear handrail set was bent inward, but easily bent back.  The red line shows the proper angle they should be at.

So this the second of three aesthetic problems I'm not super happy with.  I forgot to photograph the 4th set of cab numbers, but the point is that assuming it was also 100% correct, there is a 50% error rate on the decal job.
  • The upper left looks great. 
  • The G looks like a C in the upper right.  
  • The period is missing next to the G in the bottom left and the #2 is missing part of its decal.  

I have two decisions to make…Scott did get back me to already and said he should have decals available when he gets back from China.  Or I can investigate relettering my units to CofG (black-tux).

This is the last of aesthetic nightmares and not easily fixed.  This is only one example of this, but the pilot boards were not see-through on every pilot board (and step-holes for that matter).  I was hoping it was just paint clogged in the hole, but nope, my exacto blade is telling me that is metal, so solder go in there and the factory didn't go back and remove it.  This is on most of the pilot boards.  I will have to see if the step-holes is also solder or paint.

This is unfortunately one problem I can't easily fix without ruining the factory paint.  Since these units will probably get heavy weathering, I may be OK to try to remove the solder on the pilot steps, since they will get repainted.  Not happy, but its not a super huge concern compared to the lettering, steps, or roof grab-iron.

I did not take this unit apart yet to check out the cab interior, but I will do that later after I throw some power on these units.

Overall, these are really nice models for the money.  Many people, Scott and Jonathan especially, put a lot of effort into getting these units ready for us, which I really appreciate.  They provided a really good base for me to just need to add a little of my flavor to get them closer to brass quality.

Here is a summary of what I feel I need to do to these units to get them up to my standard:
  1. Swap out Kadee 805s to 745s.
  2. Swap out Nathan M5 casting with a bowser cal-scale casting.
  3. Swap out cab shades with my own Southern Prototypical brass castings. 
  4. Swap out the spark arrestors with my own Southern Prototypical brass castings.
  5. Remove all traces of the rooftop grab-iron on the front.
  6. Repaint and Redecal the numberboards so that the numbers are on the outsides of the boards.
  7. Paint the bells black.
  8. A quick mystery item that is shown below...
  9. Either fix the lettering w/ Scott's help or redo the lettering to CofG (black tux)
  10. Remove solder from the various pilot-step holes.  Repaint.
  11. Remove either paint or solder from the round side-step holes using a drill bit. Repaint.
  12. Fix the middle steps on all units...remove, remove glue, repaint, reglue.
  13. Weather.

That will all take what..21 hours for both units maybe? Give another couple of hours to reprogram the units to Q3 files, modify the CV's to my taste.

I just hope I don't find anything else.


And here is the parting shot...twins side by side, awaiting some of their owner's fine touches before their first assignment. I do plan to use these units primarily consisted together with no other units.

Oh and before I forget...here's an I-spy for everyone....what do you see on unit 206 that should be on unit 203?!?!?!?!
.
.
.
.
.
.
.
.
.
.
.
.
.
.
.
.
.
.
.
.
.
.
.
.
.
.
.
.
.
.
.
.
.
.
.
.
.
.
.
.
.
.
.
.
.
.
.
.
.
.
.
.
.
Give up?  The pilot step side-walls on 203 never got painted white! Glad that is an easy fix.  I hope Scott's new factory can learn from these mistakes and not repeat them in future releases.

Saturday, October 22, 2016

Sunset Models Southern Railway SD9's, SD40-2's, and E8's Pre-Production Updates


Been busy working on the house over the last year, so I haven't modeled anything in a long time.

I figured I would update folks on three brand new models coming out in 2R O-scale for Southern Railway modelers…lots of photos that you can click on for high-resolution.

First up are the SD9's.  Ignore the spec sheet, they are shipping to customers in November.  Can't wait to get my Southern units.  The SP sample was nice, so I expect the others to be too.

Here is a photo essay on a sample SD7 unit in SP flavor.

  • Note that the DB section comes off to reveal controls for the 3R modelers.  2R won't have anything there.  
  • Also, you will note this unit has one side with a 3R coupler and the other with a 2R coupler.  The part is removable to allow full 3R lobster claws, but can be inserted to allow both 2R and 3RS modelers the ability to put on kadee couplers.  Every 3R box will have these included. 2R will have them equipped already.  I thought it was clever.
  • The 2R/3R models both share the wipers on the back of the wheels.  This will improve ground connectivity for 3R modelers and all-wheel pickup (very necessary) for the 2R modelers.
  • Can't see the ball bearings, but the lateral play of the wheelsets looked good to me when Scott showed me.
  • Obviously, the 3R pickups in the middle of the trucks are only on 3R models.


Second are the E8's…here are some photos of the body sample. Sunset Models has confirmed that the Southern Crescent units are a go including the rooftop tanks.


Third are the SD40-2's…

Sunset Models announced that they are creating the tooling to do high hood SD40-2 units.  Southern, N&W, NS, and even second-hand CP units can now be done.  Be sure to check out their website and place your orders in for these.

Friday, January 8, 2016

Sunset Southern Crescent E8's - Update and Reservation Status

Update for anyone ever wanting a more affordable (alternate to $2k brass) O-scale E8A in the iconic Southern Crescent Green.

Sunset only has 10 reservations out of the 20 needed. If you want a show piece or were on the fence, now is the time. 2R or 3R. They are expected to come in around Summer 2016, subject to delay, but its usually not more than a few months.

Southern-Specific details:
They will get the rooftop airtanks - straight from the CEO's mouth.
They will have the correct shade of green, using the same shade of green as True Color TCP-128 Southern Green.
I am working to have other road-specific details, etc modeled correctly within budget.
I'm not sure they will have the right air reservoirs on either side of the fuel tanks, but I will probably craft, mold, and cast correct air reservoirs to fix that and offer them to others if they so desire to swap them out.

I have reviewed the E8 body CAD drawings and things are dimensionally correct.  Some other minor items will be fixed.
I will be in charge of reviewing the Southern paint and detail drawings for accuracy.  I will make sure this is done right.

I figure I should state that I have no financial incentive in this.  I still pay the same price and volunteer my time to make sure this model is accurate within budget allowed.  The only thing I get is a better model in the end. (or a model at all if there are enough reservations)

If you decide you want a unit, contact 3rd Rail/Sunset Models to reserve:

Sunday, November 15, 2015

So, are Lionel's new scale 21" cars worth converting to 2R?

Since the announcement of these 21" cars by Lionel, I've been eyeing them and hoping they would be accurate enough to use for my Southern train.  As seen by my earlier preliminary post, the cars they decided to do were a hodgepodge of mixed ancestry and somewhat unique cars that I knew they'd never get right.

I finally had the chance to see the tooling up close at Fall York 2015.  After learning that the first 4 sets of cars are all based off of NYC-Empire State Express tooling, I then decided to see if it was worth re-using the ends, interior, underframe, etc. to make my own cars using Union Station Product Styrene sides. Below are my photos, analysis, and my decision...


Really nicely done ends.  They come in full-width and non-full-width. Off to a good start.


Here is a general image of how the fluting looks to be more or less correct, including the skirting. This particular car has windows that use up the entire gap between the fluting.  Southern (and also other roads) had cars that had slightly smaller windows.


Between the above three photos, you can see really nice trucks.  However you also should be able to see that the cars sit extremely high on their trucks.  Maybe .25"? I have a feeling this is going to be the biggest flaw in the release of these cars besides every car being an NYC-prototype. IMHO, it looks just as bad as putting the windows on from the outside...what a joke.  For brand new tooling, I can't believe mistakes (or some may call them concessions) like this are being made. The Lionel product manager said he was working to correct this ride height issue on newer releases, but those buying the initial product are stuck with this design.

Personally, Lionel is making brand new tooling...I can't believe the kinds of mistakes (not really concessions IMO) they're making on these cars. They're trying to sell to an audience that cares about this kind of stuff...they shouldn't be able to get away with these kinds of mistakes.  They fix the windows and screw up the ride height.  I don't want the cars to hurt Lionel financially, but they're doing an injustice to consumers, but since the cars come in an orange box, I bet modelers will just eat them up regardless.  It's a shame because Lionel obviously has a talented staff that can make the rest of the car look really amazing, yet someone screwed up on something really obvious.


Since I would have to swap wheels for 2R wheels anyway, I went to investigate if I could fix the height issue.  I think it is possible.  See the two screws on the inside of the truck?  There are 2 more on the other side and these hold the truck to a bolster that I believe could be replaced with a brass piece that would allow the trucks to sit lower.  However, the way Lionel did their couplers, I think this will be difficult unless modelers go to Kadee couplers...


They're using those Kinematic couplers again.  Nice design except for the spring that you can easily see in the center.  The problem is that it uses the entire space and appears to be the reason why the cars are so highwater.  Again, I think if folks can afford to go to kadees on these, they might be ok.  (Even if you truck-mount the kadees...since you're going to have to make new mounts anyway to fix the ride height issue.)


Again, windows, fluting, all done really nice.  However, Lionel likes to use these giant rivets in alot of their cars. (PS-4 flats, 40' flats, boxcar running boards, etc.) The letterboards have these unsightly and unprototypical rivets on them. I assume it makes them more durable over time, but I don't get why they just don't glue them on.  It matches the prototype better, can be repaired if they do fall off at some point.


So here's more on the windows.  They're flush mounted and have the black gaskets.  They look extremely good on these cars.  What a shame they don't make accurate sides for every road name.  The guy at Lionel said they were going to have accurate sides as much as they could moving forward, especially for the UP (excursion?) train coming out soon. There may be some other designs that will come along over time...ok cool, but doesn't help me here.

A shot of the observation car.  Nothing really to complaint about, but since its not a blunt-end observation car, they should have went ahead and added a scale coupler here to make it look better...just like they put on the front of some of their top of the line steam engines.


To be honest, I'm not a passenger car underframe expert.  There is a lot of random compressors, condensers, battery boxes, etc. and I don't really know what's correct, though I could sit with some of my books and start pointing out whats right and wrong. I will start to learn though...Rapido Trains has a good page on this stuff: http://rapidotrains.com/budddetail.html I bet some think the same when it comes to window/door arrangements, fluting, etc. on the rest of these cars, but those are spotting features, which are features that make a particular car, loco, etc. unique and distinguishable from another besides their reporting marks. While the majority of these underframe items face the track, they can still be seen when looking at the cars from the side, and sometimes count as part of those spotting features.  In any case, these cars look to be really nice and even have a switch to turn the LED lighting on and off.

I don't have any photo's of the interior, but the interiors looked really nice when I asked Mike Reagan to open a car so I could see inside.  However, they will come unpainted and without passengers.  Not a deal breaker to me, but that could be quite a bit of work to some of those out there who want that to be done already.  The LED lighting already set up inside was a plus to me, but I can make my own pretty easily.

I also think the paint they're using matches the prototype relatively well.  No complaints there, but since I'd have to redo the sides, I didn't care that much.


So...considering street price at about $100/car to just reuse the bare bones and with what I've seen, I am not going to buy these for that purpose.  I think fixing the ride height is a lot more work than its worth.  I would paying for a lot of things that I can't reuse (Lionel won't sell interiors, so I can't even mix and match interiors to get close enough patterns), and probably couldn't resell for very much.  This leaving me some options, in order of preference:
  1. Continue to badger 3rd Rail to make a Southern Crescent.  I think there is enough market to sell an accurate train to the market, especially after Lionel's poor cookie-cutter attempt here.
  2. Take some other secondary market 2R offerings at a cheaper price (Weaver 21" Kline 21" etc) and use those as my base to build up nice cars.
  3. Wait to see if Lionel improves their cars and use future offerings as my base.
  4. Make my own entirely from scratch...something I was hoping not to do.

To those getting these cars for the NYC ESE, congrats...they will look really nice once you fix the ride height issues, paint the interiors, and add figures, but I really think fixing the ride height consistently across a whole train is going to eat up a lot of time. I hope Lionel learns from these early 21" car mistakes and makes a product that folks want.  For the mean time, I think 3rd Rail and AtlasO still have plenty of room to continue making 21" cars, especially if they make accurate cars per railroad.

As a side note...took a look at Rapido Trains to see how detailed their cars are in comparison, how good their stainless steel looks, etc.  Sadly, O-scale still needs a Rapido-like company. They are truly the best passenger car company. (in HO and N)  For $109, these cars BLOW out anything seen in O-scale, even 3rd Rail. They pay attention to every detail...shades at different heights, painted interiors, extremely detailed underframe detail, lots of end-car details, etc.  I'd gladly pay double (O is double the size and double the price right?) These cars truly rival exquisite brass in finish and in detail.  It's a shame.  Don't believe me?  See here (Scroll down and click on images): http://rapidotrains.com/budd1.html


Modeling: First Weathering Job in New House - MTH SCL SD45's

My dad came to do some work on my house.  In return I weathered his new MTH SCL SD45 units and SCL caboose.

Quick Reviews:

The MTH caboose, after you look past the poor-looking trucks (they have used this for over a decade), are rather nice.  They did a pretty good job on this one, but are missing a lot of the finer small text that would have been along the sill, etc.  The MTH SD45's are really good plastic models...however MTH's paint job is rather atrocious, but my dad wanted to keep them anyway.  I would have returned them to make a point to MTH to step up their QA. If they don't have the expertise to do it themselves, they need to borrow modelers that care to review their pilot samples, etc.

MTH screwed up:
  • the font of the numbers on the numberboards
  • the size of the numbers on the side of the cab
  • the spacing of the yellow stripes (which I think led to the cab number size problem)
  • the headlight housing being silver...this may be true for one or two units, but most photos I see in the early 1970's are BLACK
  • Incorrect horn, leaving the modeler to dish out $16 to build a Des Plaines Hobbies brass kit
MTH got right:
  • Shades of black, silver, and yellow
  • overall body accuracy
  • additional MU box located above the pilots
Onto the weathering...

I weathered the trucks/pilots/fuel tanks with an airbrush and pan pastels.  My dad wanted lighter bodies, so I pan pasteled the bodies all over with light tan color as per prototype photo's found online. These photo's also showed that these units had plows on the front, so I weathered the plows and added them on when I was done. Yes, the numberboards are missing.  More on that below.

The caboose got roughly the same color treatment along the sill, underframe, trucks, and couplers.  I did paint the air hose glad hands and angle cocks silver. I painted all wheelfaces roof brown.

As a side note, I did adjust the camera light sensitivity to make it easier to see the pan pastel dusting on the shells.  Weathering is more subtle IRL.

(And I will remind non-blog users - clicking images results in hi-res photos)

Group Shot

 Front Angle Shot

 Side Angle Shot

 Caboose Shot

My makeshift spray booth...


Fixing the cab numbers is more work than its worth, considering I'd probably have to repaint each locomotive entirely to make it harder to tell that I changed the numbers. It may have resulted in redoing the yellow striping too.  The numberboards are much easier to fix, but took longer to do, so I mailed them to my dad after he had left.  Luckily the microscale numbers fit the numberboards.  They do, however, have to be cut out individually and put into place as the microscale spacing is not correct as is (per prototype photo).


 Just some modeling in action: Individually cut numbers. Sanded off numberboards, which were then repainted with a thin coat of white and glosscoted.  See the arrows? The back of the boards have angled plastic so that they fit in a specific way.  I had to keep track of this to make sure the numbers went on correctly so when put back into the shell, they remain rightside up.


 Note 1: There are two sizes of numberboards, one for the front and one for the rear.  I didn't realize this until I decaled the first one and used it as a template to do the second one and saw the slight size difference.  

Note 2: Also apparently never take a macro photo of microscale decals...you can see all of the microscopic flaws that we cannot see easily with our eyes at even the 1" distance. 

Note 3: Picture is before final glosscote layer after decal placement, thus easy to see decal lines.


Here is how the prototype, MTH, and my numberboards compare. MTH needs better quality control.  This is pretty ridiculous. They used the same sad front on my Southern F7s from a few years ago too. It appears they just don't care anymore.

Wednesday, November 11, 2015

New Layout Space

I bought a basement and it came with a house.  The basement is 1200SQFT overall, but that's divided into two halves.  On the right side of the stairs is a bathroom, bedroom, utilities room.  On the left side of the stairs is a 40x13.5 room and an additional 16x11 room.  If things became dire, I would knock out some walls and extend the trainroom into the bedroom to add another 12' or so, but for now, that will not be necessary.

Below are two shots.  The first is of the trainroom.  It's still a mess, even a month after move-in.  I have rebuilt my shelves and the rolling stock boxes have been lined up on the left.  Once I move the Lionel boxes into the shelves, they will all sit below layout height and be out of sight.  There is a window immediately to the left, but I will figure out how to make something to cover over the window as I want to have scenery around all walls.  There is also a door on the far left that will let me bring materials easily into the house, but it too will be blocked by a swing-out piece for the layout.  This will also allow me to brew beer and easily move it all back inside for fermentation.

You can see the door to the storage room on the right to the second picture. (The entrance to the whole area is to the right of these doors as well.)


(Click on the images to see higher-resolution if desired.)


This second picture shows an unfinished storage room.  The right-hand side has a bunch of storage for train boxes and other materials and my tools.  The bowflex takes up quite a bit of space, but when I saw a deal for it for $100, I couldn't pass it up.  It will be nice not having to leave home to workout.

The lefthand side will become my initial workbench.  I've yet to figure out plans, but I am looking to have a 4ft section I can sit at and model and then an 8ft section to the right of that to do any serious house and train projects on.  The 4ft section will be about 29" high and the 8ft section is undecided...40" or so.  I'm still researching online for best practices.

I will probably finish out this room at some point, but its not urgent for me at this time.  I am still deciding whether or not I want to bring the layout into this space...break down all of the walls, or make a new entrance, close out where the current doors are, and have a tunnel come in there for a staging yard.

Lots of decisions...but more housework to be done before more fun can be had.

Sunday, September 13, 2015

Pre-production Review of Lionel's 21" Southern Passenger Cars

I've been extremely intrigued with Lionel's attempt to do 21" passenger cars.  However, I'm not convinced they will do the Southern cars accurately or worth while to buy them....below is my review of the cars for other modelers who may care about accuracy. Click the image to read the text and see pictorial comparisons to what Lionel is producing vs. the prototype.


A 2025 update: When Lionel did finally release these cars years ago, they ended up putting Southern lettering on NYC ESE cars. A hard pass for me, which led me to wait out a run from Golden Gate Depot.