Sunday, November 15, 2015

So, are Lionel's new scale 21" cars worth converting to 2R?

Since the announcement of these 21" cars by Lionel, I've been eyeing them and hoping they would be accurate enough to use for my Southern train.  As seen by my earlier preliminary post, the cars they decided to do were a hodgepodge of mixed ancestry and somewhat unique cars that I knew they'd never get right.

I finally had the chance to see the tooling up close at Fall York 2015.  After learning that the first 4 sets of cars are all based off of NYC-Empire State Express tooling, I then decided to see if it was worth re-using the ends, interior, underframe, etc. to make my own cars using Union Station Product Styrene sides. Below are my photos, analysis, and my decision...


Really nicely done ends.  They come in full-width and non-full-width. Off to a good start.


Here is a general image of how the fluting looks to be more or less correct, including the skirting. This particular car has windows that use up the entire gap between the fluting.  Southern (and also other roads) had cars that had slightly smaller windows.


Between the above three photos, you can see really nice trucks.  However you also should be able to see that the cars sit extremely high on their trucks.  Maybe .25"? I have a feeling this is going to be the biggest flaw in the release of these cars besides every car being an NYC-prototype. IMHO, it looks just as bad as putting the windows on from the outside...what a joke.  For brand new tooling, I can't believe mistakes (or some may call them concessions) like this are being made. The Lionel product manager said he was working to correct this ride height issue on newer releases, but those buying the initial product are stuck with this design.

Personally, Lionel is making brand new tooling...I can't believe the kinds of mistakes (not really concessions IMO) they're making on these cars. They're trying to sell to an audience that cares about this kind of stuff...they shouldn't be able to get away with these kinds of mistakes.  They fix the windows and screw up the ride height.  I don't want the cars to hurt Lionel financially, but they're doing an injustice to consumers, but since the cars come in an orange box, I bet modelers will just eat them up regardless.  It's a shame because Lionel obviously has a talented staff that can make the rest of the car look really amazing, yet someone screwed up on something really obvious.


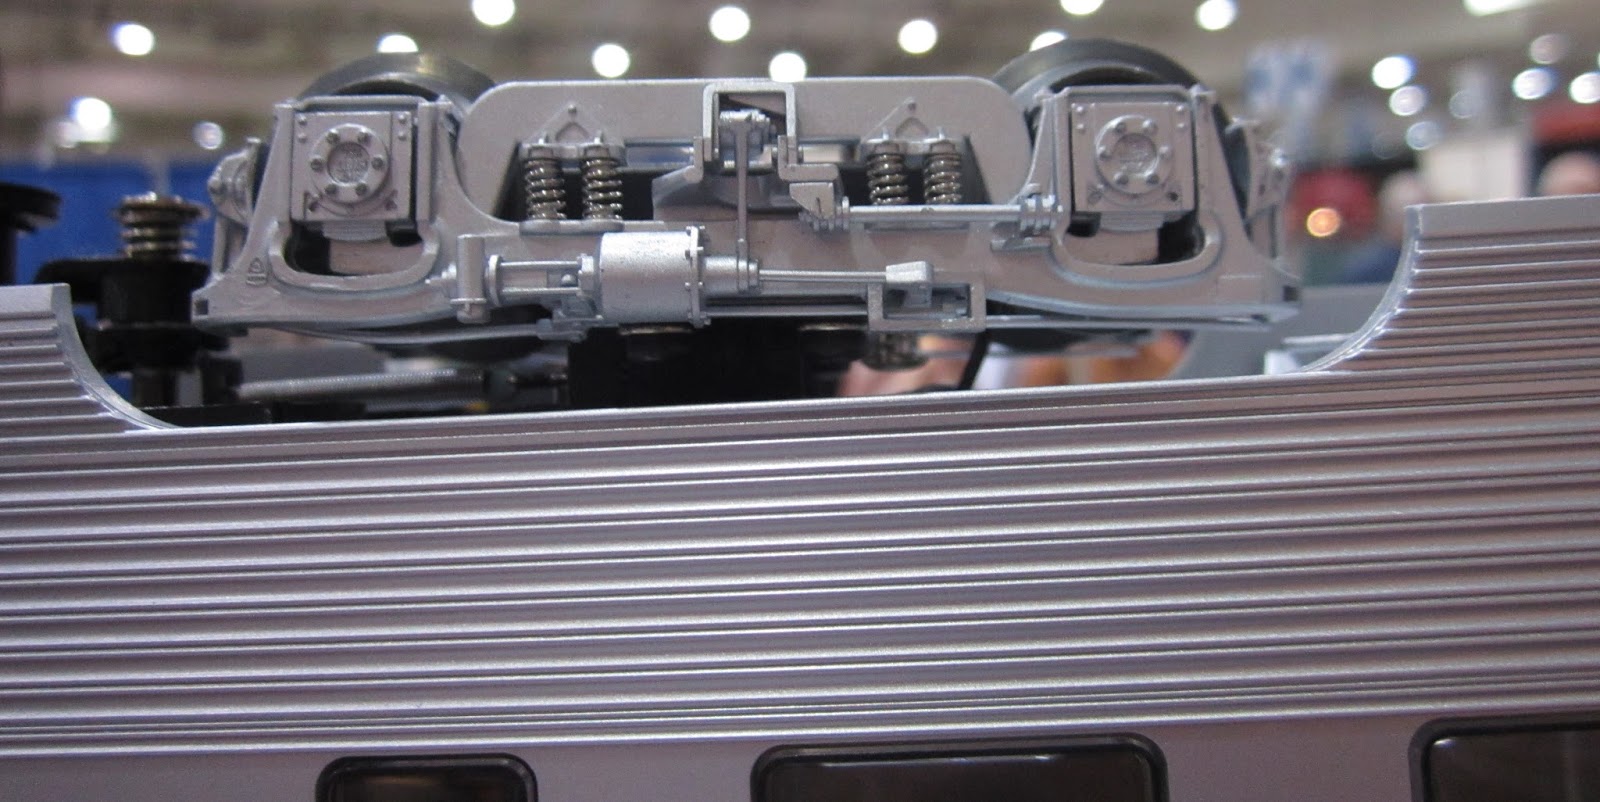
Since I would have to swap wheels for 2R wheels anyway, I went to investigate if I could fix the height issue.  I think it is possible.  See the two screws on the inside of the truck?  There are 2 more on the other side and these hold the truck to a bolster that I believe could be replaced with a brass piece that would allow the trucks to sit lower.  However, the way Lionel did their couplers, I think this will be difficult unless modelers go to Kadee couplers...


They're using those Kinematic couplers again.  Nice design except for the spring that you can easily see in the center.  The problem is that it uses the entire space and appears to be the reason why the cars are so highwater.  Again, I think if folks can afford to go to kadees on these, they might be ok.  (Even if you truck-mount the kadees...since you're going to have to make new mounts anyway to fix the ride height issue.)


Again, windows, fluting, all done really nice.  However, Lionel likes to use these giant rivets in alot of their cars. (PS-4 flats, 40' flats, boxcar running boards, etc.) The letterboards have these unsightly and unprototypical rivets on them. I assume it makes them more durable over time, but I don't get why they just don't glue them on.  It matches the prototype better, can be repaired if they do fall off at some point.


So here's more on the windows.  They're flush mounted and have the black gaskets.  They look extremely good on these cars.  What a shame they don't make accurate sides for every road name.  The guy at Lionel said they were going to have accurate sides as much as they could moving forward, especially for the UP (excursion?) train coming out soon. There may be some other designs that will come along over time...ok cool, but doesn't help me here.

A shot of the observation car.  Nothing really to complaint about, but since its not a blunt-end observation car, they should have went ahead and added a scale coupler here to make it look better...just like they put on the front of some of their top of the line steam engines.


To be honest, I'm not a passenger car underframe expert.  There is a lot of random compressors, condensers, battery boxes, etc. and I don't really know what's correct, though I could sit with some of my books and start pointing out whats right and wrong. I will start to learn though...Rapido Trains has a good page on this stuff: http://rapidotrains.com/budddetail.html I bet some think the same when it comes to window/door arrangements, fluting, etc. on the rest of these cars, but those are spotting features, which are features that make a particular car, loco, etc. unique and distinguishable from another besides their reporting marks. While the majority of these underframe items face the track, they can still be seen when looking at the cars from the side, and sometimes count as part of those spotting features.  In any case, these cars look to be really nice and even have a switch to turn the LED lighting on and off.

I don't have any photo's of the interior, but the interiors looked really nice when I asked Mike Reagan to open a car so I could see inside.  However, they will come unpainted and without passengers.  Not a deal breaker to me, but that could be quite a bit of work to some of those out there who want that to be done already.  The LED lighting already set up inside was a plus to me, but I can make my own pretty easily.

I also think the paint they're using matches the prototype relatively well.  No complaints there, but since I'd have to redo the sides, I didn't care that much.


So...considering street price at about $100/car to just reuse the bare bones and with what I've seen, I am not going to buy these for that purpose.  I think fixing the ride height is a lot more work than its worth.  I would paying for a lot of things that I can't reuse (Lionel won't sell interiors, so I can't even mix and match interiors to get close enough patterns), and probably couldn't resell for very much.  This leaving me some options, in order of preference:
  1. Continue to badger 3rd Rail to make a Southern Crescent.  I think there is enough market to sell an accurate train to the market, especially after Lionel's poor cookie-cutter attempt here.
  2. Take some other secondary market 2R offerings at a cheaper price (Weaver 21" Kline 21" etc) and use those as my base to build up nice cars.
  3. Wait to see if Lionel improves their cars and use future offerings as my base.
  4. Make my own entirely from scratch...something I was hoping not to do.

To those getting these cars for the NYC ESE, congrats...they will look really nice once you fix the ride height issues, paint the interiors, and add figures, but I really think fixing the ride height consistently across a whole train is going to eat up a lot of time. I hope Lionel learns from these early 21" car mistakes and makes a product that folks want.  For the mean time, I think 3rd Rail and AtlasO still have plenty of room to continue making 21" cars, especially if they make accurate cars per railroad.

As a side note...took a look at Rapido Trains to see how detailed their cars are in comparison, how good their stainless steel looks, etc.  Sadly, O-scale still needs a Rapido-like company. They are truly the best passenger car company. (in HO and N)  For $109, these cars BLOW out anything seen in O-scale, even 3rd Rail. They pay attention to every detail...shades at different heights, painted interiors, extremely detailed underframe detail, lots of end-car details, etc.  I'd gladly pay double (O is double the size and double the price right?) These cars truly rival exquisite brass in finish and in detail.  It's a shame.  Don't believe me?  See here (Scroll down and click on images): http://rapidotrains.com/budd1.html


First Weathering Job in New House - MTH SCL SD45's

My dad came to do some work on my house.  In return I weathered his new MTH SCL SD45 units and SCL caboose.

Quick Reviews:

The MTH caboose, after you look past the poor-looking trucks (they have used this for over a decade), are rather nice.  They did a pretty good job on this one, but are missing a lot of the finer small text that would have been along the sill, etc.  The MTH SD45's are really good plastic models...however MTH's paint job is rather atrocious, but my dad wanted to keep them anyway.  I would have returned them to make a point to MTH to step up their QA. If they don't have the expertise to do it themselves, they need to borrow modelers that care to review their pilot samples, etc.

MTH screwed up:
  • the font of the numbers on the numberboards
  • the size of the numbers on the side of the cab
  • the spacing of the yellow stripes (which I think led to the cab number size problem)
  • the headlight housing being silver...this may be true for one or two units, but most photos I see in the early 1970's are BLACK
  • Incorrect horn, leaving the modeler to dish out $16 to build a Des Plaines Hobbies brass kit
MTH got right:
  • Shades of black, silver, and yellow
  • overall body accuracy
  • additional MU box located above the pilots
Onto the weathering...

I weathered the trucks/pilots/fuel tanks with an airbrush and pan pastels.  My dad wanted lighter bodies, so I pan pasteled the bodies all over with light tan color as per prototype photo's found online. These photo's also showed that these units had plows on the front, so I weathered the plows and added them on when I was done. Yes, the numberboards are missing.  More on that below.

The caboose got roughly the same color treatment along the sill, underframe, trucks, and couplers.  I did paint the air hose glad hands and angle cocks silver. I painted all wheelfaces roof brown.

As a side note, I did adjust the camera light sensitivity to make it easier to see the pan pastel dusting on the shells.  Weathering is more subtle IRL.

(And I will remind non-blog users - clicking images results in hi-res photos)

Group Shot

 Front Angle Shot

 Side Angle Shot

 Caboose Shot

My makeshift spray booth...


Fixing the cab numbers is more work than its worth, considering I'd probably have to repaint each locomotive entirely to make it harder to tell that I changed the numbers. It may have resulted in redoing the yellow striping too.  The numberboards are much easier to fix, but took longer to do, so I mailed them to my dad after he had left.  Luckily the microscale numbers fit the numberboards.  They do, however, have to be cut out individually and put into place as the microscale spacing is not correct as is (per prototype photo).


 Just some modeling in action: Individually cut numbers. Sanded off numberboards, which were then repainted with a thin coat of white and glosscoted.  See the arrows? The back of the boards have angled plastic so that they fit in a specific way.  I had to keep track of this to make sure the numbers went on correctly so when put back into the shell, they remain rightside up.


 Note 1: There are two sizes of numberboards, one for the front and one for the rear.  I didn't realize this until I decaled the first one and used it as a template to do the second one and saw the slight size difference.  

Note 2: Also apparently never take a macro photo of microscale decals...you can see all of the microscopic flaws that we cannot see easily with our eyes at even the 1" distance. 

Note 3: Picture is before final glosscote layer after decal placement, thus easy to see decal lines.


Here is how the prototype, MTH, and my numberboards compare. MTH needs better quality control.  This is pretty ridiculous. They used the same sad front on my Southern F7s from a few years ago too. It appears they just don't care anymore.

Wednesday, November 11, 2015

New Layout Space

I bought a basement and it came with a house.  The basement is 1200SQFT overall, but that's divided into two halves.  On the right side of the stairs is a bathroom, bedroom, utilities room.  On the left side of the stairs is a 40x13.5 room and an additional 16x11 room.  If things became dire, I would knock out some walls and extend the trainroom into the bedroom to add another 12' or so, but for now, that will not be necessary.

Below are two shots.  The first is of the trainroom.  It's still a mess, even a month after move-in.  I have rebuilt my shelves and the rolling stock boxes have been lined up on the left.  Once I move the Lionel boxes into the shelves, they will all sit below layout height and be out of sight.  There is a window immediately to the left, but I will figure out how to make something to cover over the window as I want to have scenery around all walls.  There is also a door on the far left that will let me bring materials easily into the house, but it too will be blocked by a swing-out piece for the layout.  This will also allow me to brew beer and easily move it all back inside for fermentation.

You can see the door to the storage room on the right to the second picture. (The entrance to the whole area is to the right of these doors as well.)


(Click on the images to see higher-resolution if desired.)


This second picture shows an unfinished storage room.  The right-hand side has a bunch of storage for train boxes and other materials and my tools.  The bowflex takes up quite a bit of space, but when I saw a deal for it for $100, I couldn't pass it up.  It will be nice not having to leave home to workout.

The lefthand side will become my initial workbench.  I've yet to figure out plans, but I am looking to have a 4ft section I can sit at and model and then an 8ft section to the right of that to do any serious house and train projects on.  The 4ft section will be about 29" high and the 8ft section is undecided...40" or so.  I'm still researching online for best practices.

I will probably finish out this room at some point, but its not urgent for me at this time.  I am still deciding whether or not I want to bring the layout into this space...break down all of the walls, or make a new entrance, close out where the current doors are, and have a tunnel come in there for a staging yard.

Lots of decisions...but more housework to be done before more fun can be had.