It's hard enough to find the time to do anything significant with my model trains. At times, most of my layout is more of a workbench than a layout.
It's even harder to find time to gather together modeling photos and then spend time curating some text to go along with them. Rest assured, I have much to share; just need to find some time to throw it all on here.
I spent some time helping 3rd Rail's expert with their GP30. I don't have a final say, but I did give a bit of input to make the Southern modelers happy. The overall model so far is looking good based on what I see. Glad to see Jay pick up the helm and keep that ship afloat. I know Scott had talked of retiring for awhile, so glad he's finally able to achieve that in the coming months.
I acquired a YMMW PRR X31f kit a few Strasburg's back from Tom Mapes. (looks like Pierre at YMMW is completely closing up shop.) At some point these cars were acquired (second-hand?) from the PRR and numbered into 2400-2408, in a lime green paint scheme, which my 1968 ORER still shows on their roster. Sometime between 1968 and 1972, these cars were repainted to a brown scheme and numbered to 1800-1807. I have a very nice photo from 1974, but with the doors open, it is
lacking the reporting marks and such. I was browsing the internet for more photos and came back across George Losse's blog and reminded at how nice his blog is and its a different pace than the O-Scale Facebook page and groups.io groups.
I still try to keep a pulse on the hobby and the goings-on. With that said, I updated my links sidebar a little bit to clear out some dead links and link to more relevant content. George's blog has inspired me to list out some places I think that are worth visiting, some of where I mostly only lurk.
Blogs, etc.
https://www.shamokindivision.com/
George Losse's blog on P48 Reading Modeling, but its more than that. Lots of photos on meets.
https://www.youtube.com/@normstrains
If you don't know of Norm Charbonneau by now, you should. He slashed his blog in favor of video. Wonder if editing video takes longer than editing blog posts...hmmm.
https://myp48.wordpress.com/
Gene Diemling is a P48 OG and shares his and other's P48 modeling. Posts very frequently.
Forums/Gathering
https://www.facebook.com/groups/2railoscale/
THE place IMHO for getting the latest beat on 2R Oscale. Lots of modeling using new techniques, etc. Account required, but just make a burner if you don't do FB.
https://www.modeltrainjournal.com/phpBB3/
Old school forum, but some great modelers in the 2R section. Had a bad rep, but its been cleaned up and lots of interesting discussion, especially on older 2R trains.
https://groups.io/g/OScale2RailProto48Modelers
Place to discuss or ask questions about O scale trains.
https://o-gaugeforum.com/
Interesting to see what's happening in the 3R world, as some of it has an effect on the 2R world as well.
Magazines
https://oscaleresource.com/
Free, Online O-Scale publication. The only one that published more than once a year.
https://rrmodelcraftsman.com/
Solid modeling magazine focused on prototype modeling and operations. Though mostly non-O, but that's okay.
https://oscalemag.com/
The old OST. They still publish an annual that is sort of interesting to read through.
https://model-railroad-hobbyist.com/
MRH is another free, online publication. Mostly smaller scales as well. They also have a forum. I used to read this more often, but have tailed off and need to catch back up.
Southern Railway Modeling
https://groups.io/g/southern-railway-system
General SOU group that includes former employees, railfans, and modelers. Has more members than the SRHA group.
https://southernrailway.groups.io/g/main
SRHA's main group to ask questions, etc. when you don't live close enough to Chattanooga to visit the archives.
SRHA's modeling subgroup, but it has less participants and kind of overlaps with the main group.
https://www.facebook.com/groups/sou.rr.modelers/
Good (and seemingly different) set of SOU modelers and historians here. Often get different responses than the SRHA-managed groups when asked the same questions.
Other Resources
https://oscalecentral.com/
I admit, I don't go here too often, but great reference material for oldheads and newcomers.
https://groups.io/g/OSCALEYARDSALE
Way to buy/sell/trade O Scale trains. Account required.
https://proto48.org/
Looks like my blog and hasn't been updated much recently, but if you want to learn about P48, this is the place to do it.
I'm also members of other oddball groups.io groups or FB groups that cover other roads I'm interested in, DCC, weathering, and/or prototype modeling, though my participation, including lurking, is very limited.
My notes tell me this project goes back as far as October 2016. Had it really been that long? My invoice from Sunset Models / Third Rail shows that I paid in February 2024, so yes, it really took nearly 8 years to drum up enough support, design, and produce these models. I'm not in the Sunset Models inner circle, but I did hear this was perhaps the most complex projects that Scott has ever taken on, and the amount of variations maxed his factory's ability to handle high levels of complexity.
Here's an ad for the second run of these locomotives. They run about $800 each.
In any case, here's a little bit more on the SD40-2.
The SD40-2 was the last six-axle EMD product that the Southern bought. Offered by EMD between 1972 and 1986, EMD sold over 4000 units across all roads. It was virtually an SD40, but had more reliable electrical systems, including using removable boards instead of relays. These originally all had turbocharged 16 cylinder 16-645E3 prime movers, capable of putting out 3000HP. General spotting feature differences between the SD40 and SD40'2 include the extra long porches as well as the sight glass on the fireman side of the long hood.
Like any locomotive production, the SD40-2 evolved over its production lifespan, Each notable change became a separate phase. I won't rehash what Trainiax
has done an amazing job describing. Sunset Models production is
primarily faithful to the initial production phase of 1a1, primarily
spotted by the square wire radiator intakes, and separate ECAFB behind
the cab.
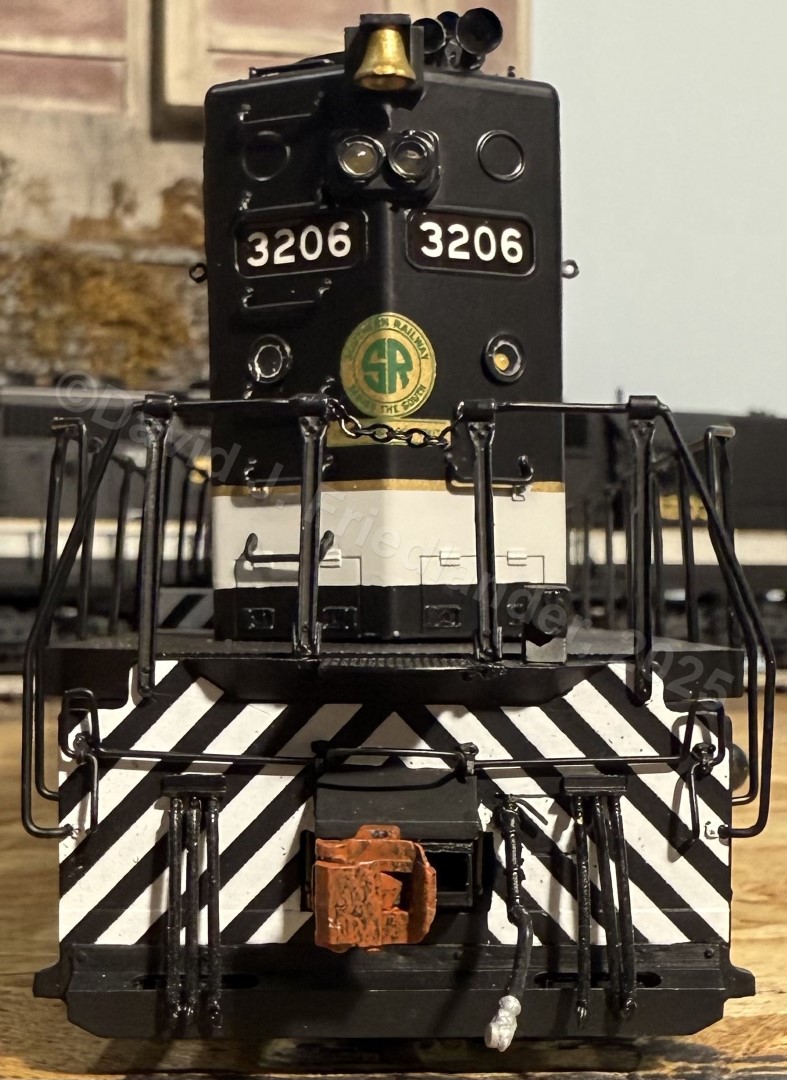
Southern's fleet of 128 locomotives was numbered 3201-3328. All units lived a second life with Norfolk Southern in 1982, except for locomotive 3217, which wrecked in 1974. Also, as of July 1974, Southern was the last railroad to purchase short high-nose units, as N&W moved to short low hood units. These units were designed to run long-hood forward. A bathroom was located in the short high hood. Sunsets tooling faithfully captures units 3201-3207. The first run contained units 3201, 3203, 3206, and 3207.
Southern's units in the initial run came originally with black handrails, white steps, and gold leaf lettering. Yellow handrails and dulux gold lettering came with later production runs and repaints. Numberboard lettering changed over the years, including with these units straight from the factory. Trust plates were located on the frame at the end of the long hood. Spotting features specific to the SOU included:
Special MU equipment to let them connect to Locotrol units.
Long-hood mounted bell.
A pair of Nathan P-3 horns at both ends of the locomotive body.
Walkway lights mounted along the paths taken to get into the cab.
Rectangular cab awnings
I did assist with the CAD and artwork on these. From a CAD perspective, I helped push for the emergency brake chain and correct Jack Pads as well as the emergency fuel stop button and air filter. I helped correct several rivets and lift rings that were missing on the roof. Placement of those along with handrails and some door latches were also an issue on the first round. Specific to Southern, the walkway lights were incorrectly designed and placed. I also pushed for a correctly laid out and facing SOU interior. Three more rounds of review found a few other smaller issues, but also included the Nathan P3 horns being incorrectly designed and the cab vent in the wrong location.
Unfortunately, I was brought in last minute to review the SOU artwork and found just shy of two dozen issues, some of very large magnitude. Examples include incorrect striping and widths both on the carbody and on the pilots; missing carbody text, no trust plate, missing safety striping on the walkway step on the engineering side, incorrect numberboard fonts, incorrect SOUTHERN placement, and incorrect 'F' font and placement. They were able to make those changes very quickly, including a last minute pilot tooling change. The factory executed rather well on these updates.
For those who would like an idea of what 3rd Rail's 2R manuals look like, here are the four pages below:
Post-arrival Review:
Upon arrival, my initial review of these models found only a handful of issues. The project did a very good job being faithful to the prototype and also included some new features that hadn't been done before:
A more accurate coupler box
Extended air hoses
Emergency brake chain under the cab.
The Southern Cab was assembled correctly.
The shortcomings that I found were as follows:
The pilot angle isn't quite right and doesn't perfectly line up with the frame shell.
The air tanks above the fuel tank are not quite the right size and are not placed outward enough.
Several handrail castings and the air hose casting is too fragile. Perhaps they should have used silver solder.
The Southern in interior, as usual, was the wrong color. The cab walls were also a little barren.
The MU casting is incorrect for Southern units.
The lettering isn't as crisp as on previous projects. Trust plates that are legible in HO are not in O.
The gold striping is missing on the ECAFB.
The fuel sight glass configuration is not quite right for Southern.
The water sight glass wasn't modeled as an actual Window.
The dynamic brake blister would not sit flush on two of my units. Turned out the castings that were placed through the blister were not filed down flush.
Some of the initial modifications I did were:
Repainting the interior gray and adding some semblance of panels on the front wall and a door and e brake on the rear wall.
Filed castings flush on the brake blister as well as drilling holes in the carbody shell to make way for anything that wouldn't sit flush.
Created a semblance of glass on the water sight glass using Testor's glass maker. I did try AtlasO's parts (MTH SD40-2 parts), but the part was too narrow.
Drill out the air hoses and solder in long leads to help bend and glue the air hoses to the pilots.
As these units would be brand new in my modeling era, I painted 'fresh' rust on the couplers and wheel faces.
What's left to do: (Note that the list is much shorter compared to past models)
Fix the air tanks on locomotives. A gentleman in the UK had designed and 3D printed the right tanks. I hope to leverage his castings.
Get correct MU castings, perhaps from Gotham Marine.
Add the gold striping on the ECAFB.
Reprogram DCC reprogramming to add depth to the locomotive sounds when running them in a consist. That and making it easier to run them as a consist or singularly. Possibly swap out soundsets with other sets.
Consider making etched legible trust plates.
Consider adding nano LED's to the walkway lights.
Consider swapping out the class lights with LED's that would give me Red/White/Green, rather than just White.
Photo Essay of the SOU units in the first run:
Here's a video of one unit in operation:
Here's another one notching the unit up to Notch 8 and back.
Loksound Decoder Addendum:
These come with ESU Loksound L decoders. The L version is limited in how deeply you can customize the functions and sounds. With that said, the manual doesn't do these decoders justice with what one can do with these decoders. For the Southern units, you will at minimum, want to read the CV29 value and write that same value +1 to reverse the 'Forward' Direction of the unit, since factory default has the short hood as the front. That or rewire the motor polarity, but that is easier said than done.
3rd Rail's SD40-2 Manual contains a handful of DCC function mistakes, outlined below:
F3 is the Rear Marker Light and not the coupler
F5 only does Front Marker Lights
F6 lights both front and rear number boards.
It is simplified on purpose, but below is an enhanced version of the function table, based on the default programming:
Default Mapping inside of LokProgrammer
Complete Function Mapping
Default Function/Sound Settings
One should also note that the sound file also contains several shortcuts for changing a handful of the sounds and features. The sounds are built into the specific sound project, so if you need something that isn't included, you have to find it in another file, or replace with a non-L version to further customize what you want. We'll start with the how to change and horn and bell.
For Southern, the only sound you'll need to change out of the box is CV163 to 12 for the Nathan P-3 horns. Everything else should be already correctly set.
Horn and Bell Selection:
2nd Gen Horn Pack 1 Horns (SoundCV9):
CV163=0 Leslie S-3K-R
CV163=1 Leslie S-3L-R
CV163=2 Leslie S-5T-F
CV163=3 Leslie S-5T-R
CV163=4 Nathan K-3H
CV163=5 Nathan K-3L
CV163=6 Nathan K-3LA
CV163=7 Nathan K-5H
CV163=8 Nathan K-5LA
CV163=9 Nathan K-5LA-R24
CV163=10 Nathan M-3
CV163=11 Nathan M-3H
CV163=12 Nathan P-3
CV163=13 Nathan P-5-R24
EMD 2nd Generation Bell Template Pack 1 Bells (SoundCV10):
EMD 2nd Generation Air Dryer Template Pack 1 Air Dryer (SoundCV12)
CV166=0 SD40-2 Air Dryer 1
CV166=1 SD40-2 Air Dryer 2
CV166=2 SD40-2 Air Dryer 3
CV166=3 SD40-2 Air Dryer 4
Primer Mover Sound Features:
This project is a reverser based low idle version. It has a single turbo early exhaust stack.
File also contains a "low Idle" Mode on F15 when Standing Still. Pressing
F15 while not moving will lower the prime mover and lock the motor. F15
must be turned off to go to "regular idle" and begin moving.
Another
"low Idle" Mode is reverser in center position. When pressing F24 while
stopped, you can throttle through the notches like the prototype in
neutral. F24 must be turned off to go to "regular idle" and begin
moving.
This project has "Run 8" mode. When turning on F26 with
F28 off, the prime mover goes to run 8. Turning off F26 returns the
prime mover sounds back to normal mode.
This project has "Coast"
mode. When turning on F27 with F28 off, the prime mover goes to idle
for coasting purposes. Turning off F27 returns the prime mover sounds
back to normal mode.
You can still use F26 and F27 for manual
notching. You have to keep both F26 and F27 off before pressing F28 to
turn on manual notching. Once F28 is on, you can use F26 to notch up and
F27 to notch down. F26, F27, and F28 must be turned off to return to
normal mode.
This project has "Load" mode. When turning on F29
with F15, F24, F26, F27, F28 off, the prime mover goes into load mode.
While you are using load mode, the prime mover will notch up 1 or more
notches based on primary load settings(CV104). The throttle notches up
using speed instead of requested speed while using the load feature. F29
must be turned off to return to normal mode.
This file is also
equipped with a Smart Start feature that cycles the prime mover on and
off at intervals of your choice if the throttle is left at Idle and the
loco is stopped.
Many Second and Third Generation locomotives have been fitted with an Automatic Bell that is triggered when the horn is blown. In MANY cases this cannot even be bypassed on modern locos. Before the FRA mandated this feature on new locomotives the bell was of course turned on and off separately. Some locomotives were delivered with a manual bell and have been converted to an automatic bell. This creates a challenge in sound file creation.
We realize that not every loco with a particular prime mover had this feature. As such we have built in an option to turn the feature on and off. We will set the default in the file to be what is most appropriate for the particular file.
To turn the feature OFF - Auto Bell OFF:
1. Remove the Auto bell sound slot from the function mapping chart CV31 = 16, CV32 = 8 ---------------------- CV311 = 4
2. Change the sound configuration of the Auto bell sound slot CV31 = 16, CV32 = 1 ---------------------- CV287 = 0
To turn the feature ON - Auto Bell ON: 1. ADD the Auto bell sound slot from the function mapping chart CV31 = 16, CV32 = 8 ---------------------- CV311 = 12
2. Change the sound configuration of the Auto bell sound slot CV31 = 16, CV32 = 1 ---------------------- CV287 = 1
Auto Bell Timer:
The Bell timer is amount of time the bell will play after the horn if the auto timer is active. The timer is broken down into 1/4 of a second increments.
CV169=4 - 1 Second
CV169=8 - 2 Seconds
CV169=12 - 3 Seconds
CV169=16 - 4 Seconds
CV169=20 - 5 Seconds - Default
Etc...
Additional Loksound Decoder Addendum:
I had run into some issues programming my units using the LokProgrammer on a programming track. Based on feedback from Loksound Support, I will eventually add a supplemental document here that should help those that wish to perform deeper configuration of their decoders.
While in Golden Gate Depot's backlog since the beginning of 2021, the Southern Railway 1950's Era Crescent finally hit enough reservations to be designed and built. The initial release was in March of 2025 and a quick second follow-on reservation slated to arrive in Fall 2025.
More on the train itself.
The Crescent originally was a pool of cars from
several railroads. The train itself ran from New York City (Penn
Station) all the way down to New Orleans. The train itself would have
been behind GG1's from Penn Station down to Washington, DC, when they switch out to SOU power. Early on, power would also potentially switch to the other railroads involved in this pooled train. Over time, SOU power would have evolved or been a mix of E7's, E8's, and FP7's.
The railroads involved in the early pooled Crescent were Southern Railway, Louisville & Nashville Railroad, Western Railway of Alabama, Atlanta & West Point Railroad, and the Pennsylvania Railroad. Some Pullman sleepers went the entire route, while some were pulled off and replaced with coaches in Atlanta. Below are a timetable and route map showing this train in 1952. The exact route and the cars that were on the train evolved over time, but New York-New Orleans exists til this day with Amtrak.
1952 Crescent Timetable
1952 Crescent Route Map
I suggested to Golden Gate Depot (GGD) that they make a purely Southern train, with add-on cars for all other road names that had cars in the consist. It turns out this is how the offering unfolded. Most of the orders to the car builders included identical cars for both the New Royal Palm and the Crescent, so it only made sense to make GGD's project financially possible by adding other road names that were a part of these builder lots. Hopefully they made other modelers happy. I have no idea what the final tallies were per road and car number.
Due to the economics, GGD usually starts with a 6 to 8-car main consist with add-on cars. Several customers helped him decide on the main 8-car consist. I helped choose cars that would have been seen on an all lightweight Crescent, though I did also suggest that a 14/4 sleeper get included, as this was likely the only chance to get one of these variants made RTR and at this level of quality.
Regardless of the 14/4 sleeper suggestion,
there are some other historical notes for this train. The re-equipped Crescent was
officially inaugurated in March 1950, and below are three permutations that
should be mentioned:
5-Buf-Lng-Obs Royal Arch was renamed
Luther Calvin Norris almost right away - in November 1950. Many photos of the 5-Buf-Lng-Obs car were taken early, so they show the Royal
Arch nameplate, but those photos were all taken during the first 9 months of
its life.
I'm not sure if both nameplates were made, but I had suggested both names for the SOU and WofA's OBS cars be in the box. The OBS car I received is named Royal Arch.
For WofA's OBS, it was named Royal Palace and then renamed Charles A.
Wickersham in 9/1952.
The
5-Buf-Lng-Obs cars only lasted 6 years in service and were converted to
11DBR sleepers, which appeared in 9/1958. As far as I know, no poll was taken, so its unknown if the majority of purchasers model this train before or after 1958, but the decision was to make the OBS. I model after this time, so mine will remain in its box forever or until I decide to sell it.
Full-width
diaphragms were removed within 1-2 years of original service. The decision was to make the cars without the full-width diaphragms. I believe the tooling was already configured this way, but this should make it easier to operate these cars around tighter curves and apply to a wider era of modeling.
This was the list that I compiled from several sources and provided to Golden Gate Depot.
This is GGD's ad for the second run of cars.
Here is the last pricelist, that I believe incorporates a small percentage for any tariffs. It also signifies what road name/car options were available. I do not have a list of every car name/road number that was done. Some of them only had one option though.
Receipt and inspection of the 8-car set.
After initial inspection and some weathering of the roof vents, wheel faces, and painting any exposed red wires black, below is what improvements I will look to tackle to bring these cars in line with my modeling era and fidelity. Work will be delayed until my additional sleepers and coaches arrive in Fall:
Modernize 1702 for 1960's - Plate Windows and Fluting; Remove Mail Catchers
Fix the Bag-Dorm numbers; should be on carbody, not fluting.
Paint screws with Krylon paint
Fix baggage-mail steps, as its missing a rung (the rung was in the CAD drawings...)
Paint interiors in prototypical colors
Add more passengers
Consider redoing window shades where they may be too aggressively pulled down.
Consider redoing the Budd Vents
Consider adding brake levers
Light weathering based on late 1960's photos
Some behind the scenes notes as I assisted with CAD and artwork review. I do not make the changes, I only study photos and the artwork and point out inaccuracies. I'm glad most of what I saw was fixed. Sometimes inaccuracies are not fixed due to prohibitive tooling cost, complexity, or factory mistakes.
CAD:
I helped correct roof vent types and locations to match prototype. The vents over the vestibules are not an exact match, but close enough.
I helped correct several missing grab irons as well as correct the location of some of them.
I helped correct the Budd Vent, though I still think the casting used doesn't have enough depth to it.
I helped correct the ends used on the Budd cars as they going to use Pullman ends.
Tooling limitations prevented some fluting that shouldn't exist, that exists on the Bag-Mail and OBS cars.
Tooling limitations prevented roof line rivets from being added, but I also found and helped get other erroneous car body rivets removed.
The raised panels that should be on the mail car next to where the catchers would hit the car were noted, but did not make it onto the final product.
I helped correct some skirting issues, but some skirting that should exist on the Bag-Mail did not make it on the final cars, I'm assuming that's due to tooling limitations.
If you wanna get into minutia, the handrails should have inward curvatures to them as well as squared doors, but none of that was modeled due to complexity and tooling limitations. Some steps on the ACF cars may not be accurate due to tooling reuse.
Bag-Mail interior isn't accurate.
Bag-Mail door handles not depicted.
I did point out some Dining Car kitchen door details that did not make it onto the production run.
The bar loading doors were missing on the OBS and Buffet car CAD files. I helped get this corrected on the production run.
I helped correct the location of the buffet car antenna location.
Artwork:
The most glaring issue I saw was that trucks and underbody were going to be Silver. They are all accurately painted black in the production run.
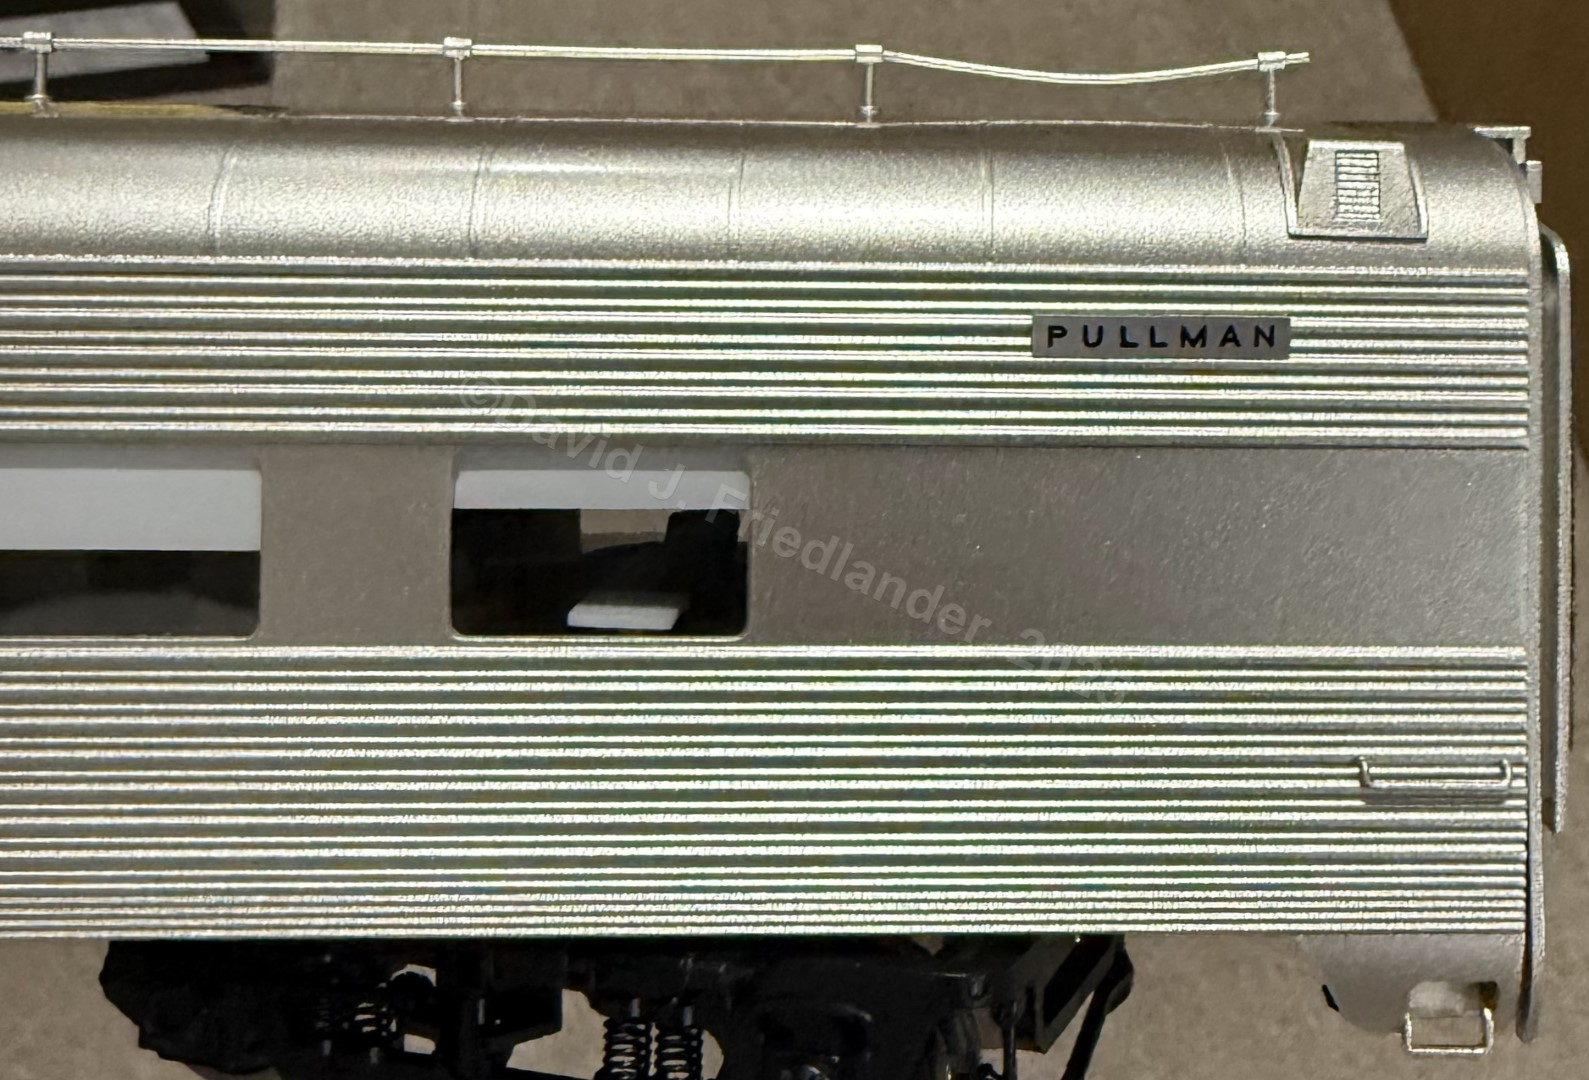
PULLMAN was missing off of most of the corner plates.
I believe the mail catchers should be black and not silver.
The original FEC OBS artwork had the modern FEC logo added to it. I pointed it out and I hope it was removed on the production run.
I did note that the length of the name plates should vary based on the car names - basically only as long as the lettering required. I am assuming due to complexity and risk of mistakes, every car nameplate looks to be the same length.
Some SOU cars had SOU emblems added to them, which was not accurate for 1950's. However, 1970's modelers can add those themselves and/or paint the roofs black easily.
I helped correct the sizing and spacing of SOUTHERN and road numbers on some of the cars.
The placement of the car nameplate and roadname nameplate were off. Some of them were fixed, some of them were not.
The factory often in their first draft of artwork, uses photos of cars that sometimes are of modern day configurations of these historic cars. For example, one of the Buf-Lng cars is or was at some point WATX 2351, so the artwork had reporting marks on them by mistake. This was caught and was removed on the production run.
I had also caught a fluting issue on the Budd cars. CAD was correct, but the artwork wasn't prepared correctly for all of the fluting.
I pointed out that the Bag-Dorm car number should on the carbody and not top of the fluting, but unfortunately, that wasn't fixed in the production run.
Below is a photo essay of the main set minus the observation car as I unboxed them, inspected them, installed couplers, and lightly weathered the wheel faces and roof vents.
Unboxing - These 8 boxes all fit into one cardboard shipper.
Parts Baggies - Customer must attach any necessary steps.
Be careful, as I did have a screw head break off with no much torque and luckily there is enough tension on the step to keep it in place.
The parts and screw holes were all aligned.
Underbody Details
10-6 sleeper underbody cluster:
baggage-mail underbody cluster:
Trucks
Coupler Installation Testing (Ended up using 805's on the innermost set of holes)
Defects found during inspection - I found some minor issues with my set. Some damage on a numberboard. The antenna was bent in transit, but was carefully re-bent straight. The
interior in one of cars was clearly not wavy. Taking off the end, it was not inserted correctly into the shell.
Paint Matching - I found a paint that matches these cars that can be used for screw heads and other modifications.
Vent Weathering - I weathered all vents with black washes to add depth and darken where there should be vents rather than flat surfaces.
ACF Bag-Mail Vents
Budd Kitchen Vents
ACF Bag-Dorm Vents
10-6 Vents
Lighting - I do think the temperature and intensity is rather good. I don't see an immediate need to adjust either.
Each car has a nice weight to it, not only from the Aluminum body,
but from the full interior. Some cars felt heavier than others, so I
decided to weigh them. They vary between 2 and 3lbs. While the trucks
they ride on are not equalized, they do contain ball bearings and roll
very easily.
Pullman 10-6 Sleepers
Pullman 14-4 Sleepers
ACF Bag-Dorm
ACF Bag-Mail
CAD showing they were going to reuse this casting, but the production casting is missing the middle step.
Budd Dining Car
Budd Coach
(Budd Vent on left)
Pullman Lounge Car
Thanks for looking. Don't forget, you can click into any image and see the full size.
Overall, I'm glad this train hit enough momentum to get done. Regardless of a few flaws and high cost, the train mostly faithfully follows the prototype and is far better than most anything most of us can scratchbuild at this level of detail, straightness, and consistent finish. Thanks to Scott and his factory that can build such well-built cars. I had his first attempt, the NYC ESE, and these have come a very long way. This set gives me enough cars to model a handful of late 60's passenger trains. I also have one MAC Shops lightweight car of a different prototype and it will be many hours of work to get it anywhere close to the level of detail of these RTR cars.
I see quite a few individuals complain and balk at the high price GGD asks for their passenger cars. There's a lot of work that goes into these cars and costs continue to rise as demand continues to stall or soften. Rapido is the gold standard of passenger cars? Sure, but HO has a much larger economies of scale and some uber-dedicated hobbyists running their company, that is making things for his own layout. Some complaints originate from those who never could afford or would spend that kind of money on a hobby. I don't get why they even chime in with this pessimistic viewpoint. It makes them look petty or upset that life didn't deal them the best cards. Social media hasn't helped with that with all of the look-at-me and my latest purchase types. For those that are on the edge and are trying to understand what more do they get from a more premium product, they should consider the following:
Does my budget allow me to even consider these cars?
Do I desire a high-end, high-fidelity passenger train?
Has GGD made or is making a passenger train that I really need?
Do I have a trackplan that realistically allows for 21" cars?
If you can answer yes to those questions, then by all means, consider shifting your budget and obtain what could become a focal point of your layout. If you already have too many trains, well, that's a different problem.
Personally, I strive for high-detail and quality over quantity. Before this purchase, I owned maybe 4-5 passenger cars that still need to modified and repainted into SOU prototype. I shifted my budget to ensure I could purchase some key, expensive items such as this passenger train. I determined I really only need one or two passenger trains on my layout, so its worth the one-time splurge to get the fidelity of cars I desire that are specific to my modeling interests at the sacrifice of other purchases. I could have 2R'ed and re-lettered generic Lionel or K-line 21" cars, but I desire higher levels of accuracy and detail.
To those who say just build it yourself. I could, but with this level of detail, the raw parts would most likely be half the price of the RTR model and more importantly, hundreds of hours of my life spread across design, procurement, and assembly. Time is limited. I think the real bargain here is that I just saved myself hundreds of hours from building equivalently detailed and finished cars.


.JPG)


