Showing posts with label Repaints. Show all posts

Monday, December 4, 2023

Modeling: O-scale - Overland Models (OMI) - Southern Railway Scale Test Car

Wanted to share some work I did to try to model a scale test car related to Southern based on one type.


It's not perfect, but close enough for my needs.  I drew the decals needed based off this photo:


Other than styrene used for the ACI plate, the rest of the car is an Overland Models, Inc. (OMI) Baldwin Scale Test Car with Vertical Brake.  Plastic Kadee couplers were used and had to be heavily sanded to get it to fit the existing coupler box. After primer, it was painted Polly Scale Acrylic Reefer Orange.


Weathering was a mix of acrylic paint and pan pastels.


Looking back on it, the decals maybe should have been black and not a dark turquoise.  On deeper review, I believe the black is heavily faded and not green in the photo. Oops. Maybe I'll fix it one day.

Monday, September 18, 2017

Modeling: O Scale 2R CG SD9s Waiting for their Breathers

Quick Photos showing that these guys are basically done, fully weathered, replaced with Loksound decoders and are waiting for their fuel tank pipe breathers...coming soon.  Then a better photoshoot will be taken.


It is possible that these and several other of my projects will make an appearance in a clinic at the O Scale National 2018 on how to take a good base model and take it that extra mile to suit your prototype in a specific era.

Thursday, May 25, 2017

Modeling: April Project Month - Parts4-6: Misc SOU/SCL Diesel Jobs

I forgot to get photos of these 3 projects before I left:
  • SCL FT units (no photos)
  • SOU F3 paint touch-ups (no photos)
  • SOU SD9 (Of course MTH announces one as I finished this one...no photos)
My dad had bought an ABA set of ACL FT units.  Despite never having had them, he wanted them SCL.  I went ahead and used F3/F7 units as my guides.  I first removed all window material/port lenses for proper decal prep.  I carefully sanded off the ACL lettering and repainted the area with black paint.  After the glosscote, it is hard to tell that the area was ever touched.  I then added the SCL lettering, the SCL logo under the cab windows, and the SCL herald on the nose.  The only bad part is that the herald yellow does not match the yellow MTH chose.  Bummer.  Maybe a 5-6 hour due to the careful sanding of the ACL lettering, to ensure nothing else was removed.


My dad had some MTH F3 units that had some paint scratches on the edges of the green on the units.  The tru-color green is a good match.  A quick little hour job spread over two or three passes.  I would suggest getting the flat-paintable version, as it did go on a little glossier than the existing paint, but luckily it was just small paint nicks and passable.


The SOU SD9 was a complete repaint from a pretty old Protosound2 C&O unit.  No super-detailing at all.  These units are too crude to warrant any more than a repaint job from me IMHO.  The paint on these was on good.  I wish I had a sandblaster for this particular one, but oh well.  Lots of time in the 91% isopropyl and a toothbrush got the job done.  The experiment of gloss black was tried on this guy too, but won't do that again.  I looked at pictures and decided to use unit 204W as my guide. (Which is good in case my dad wants to get the newly catalogued 202 unit.) 

Hardest part on this one is the imitation aluminum striping.  I noticed the new microscale decal sets do not use the striping, but rather just giving you the gold stripes and force you to paint the imitation aluminum stripes.  Probably a good idea, and will pick up tru-color for that.  Laying the stripes is a real PITA because there are louvers and door handles that make it hard to lay the decals, requiring lots of layers of microsol, and poking with an X-acto knife.  Where the decal didn't lay right, I had some paint that I was able to use to fix any problems in the stripe.  Final product came out well. I don't know the hour estimate, but it was a lot due to the paint stripping and the stripe application. Probably 10 hours.

Modeling: April Project Month - Part2: SCL Passenger Cars

This project, while listed as Part 2, took up the bulk of my time, probably some 40+ hours when it was all said and done.  It was supposed to be a simple repainting of the lettering boards, but then there were ACI plates and SCL heralds that had to be put directly on the car bodies, so it required full-on taking everything apart to do the proper prep work to put on the Microscale decals. Things worth doing are worth doing right.  No shortcuts.

Then while apart, I figured if I was going to do them right, I might as well do the interiors.  The colors are inspired off a handful of photos from the Morning Sun ACL Color Guide.  These cars are "ex-ACL" after all.  The interior photos of SCL cars that exist that I am aware of did not show these cars anyways.  The "ex-ACL" is in quotes, since these cars are generic car bodies that MTH slathers on any old paint scheme and do not faithfully represent the prototype cars that really existed. With that being said, I probably put upwards of 10 hours in carefully trimming off the skirts with first a dremel, and then X-acto knives. It's a spotting feature, so had to be done.

These cars were made in 2015 and I must say that MTH quality has gone far up since the first set of cars I went inside some 10 or so years ago.  The people were glued in extremely well, as were the window strips.  The tooling enhancements are noticeable on the construction of the cars on the inside too. Each car had a different set of figures that MTH makes.  Smart move.

I labeled every car and interior with painters tape.  I took photos of each car before taking out the figures, to know exactly how to put them back in each car. One will even see that I managed to put keil-line dishes on 10 of the tables in the dining car.  MTH interiors are not to scale.  The dishes take up too much space on the table, but are good enough for the effect from looking outside.

I used .02" white styrene cut down to model the window shades pulled at different heights.  I knew where the figures sat, so I made sure the shades were up to see the figures. I used rubber cement to hold them in place.This ensures the window-strip material doesn't craze.  I can't speak for the longevity of how well they will hold the shades over the next decades.

The OBS got some special treatment.  I noticed in pictures that the OBS rear windows had blinds.  I printed out extremely thin vertical green strips (using MS Paint) on paper, cut them out, glued the halves together with white glue (to model both sides), and glued those in with rubber cement. I created a custom decal for the drumhead.  I also took off the 3R coupler on the rear truck, and used the existing kadee-pad to add a Kadee clone made by Weaver to the end of the OBS.

I think the only thing left I could have really done, was upgrade the lighting to flicker-free LEDs, but that's enough work for now.

Here's the Photo Essay...first up, the complete train:


Baggage: SCL 5002
Coach: SCL 5267
Coach: SCL 5464
Coach: SCL 5480
Sleeper: SCL Venice
Diner: SCL 5951
OBS: SCL 5844

 Some Work to get to the finished product:

 I airbrushed the seats first.

 Masked off the painted seats to then do most of the floor by airbrush.  Then follow up with brush.

Letterboards on their own paint board.
 This is what it looks like to take apart a whole set of cars, windows and everything in order.  Made it easier to put them back where they came from.

 I forgot the height, but I cut a bunch of strips from one sheet of .02" styrene.

 Easy to bend and rip apart.  Then file down the edges. Cut for different heights b/t windows.

 OBS blinds making in process.  Do not add glue directly to paper, drag strip across a pond of glue.

 Completed Interiors.
 Keil Line Dishes Painted.

 The ruler might be for exageration, since the fluting made it easy to line up the lettering boards.

 Some cut-off skirting done by X-acto knife only.


Roster Shots:


Some other various shots:


Dining Car:


The Observation Car:


Monday, May 22, 2017

Modeling: April Project Month - Part1: SCL RS3 1161

Over the month of April, I scrapped together as much time as I could to finish out several 3R O gauge projects for my dad. I had some of his stuff in my house for 2-3 years and hadn't had a chance to work on it.  I put everything aside to get these out of my basement.

This is the first of several posts.  He runs 3R O gauge trains, in SCL, SOU, NYC, and various other roads. I finished out several things...ironically they were all made by MTH.
1. SCL RS3
2. SCL Passenger Cars
3. SCL SD45 Modifications/Weathering
4. SCL FT units (no photos)
5. SOU F3 paint touch-ups (no photos)
6. SOU SD9 (Of course MTH announces one as I finished this one...no photos)
7. SCL RPO - Still in progress.

The model itself is an MTH Protosound2 RS3 and was painted UP.

This SCL RS3 is a pure repaint and weathering job, nothing more. There was no effort on this one to do any sort of super-detailing (minus the addition of number boards on the ends), etc. However, this one closely resembles the prototype, including the horns.

I used this to try a few things. One being the use of Testor's rattle cans to lay on the semi-gloss black paint.  I won't ever do it again.  The paint goes on too thick, so I will forevermore use only airbrushes on anything that touches the rails.  Buildings are another story. I also learned that the gloss spray paint wasn't worth it, and that I needed to gloss-cote anyways, so flat black is fine as a base coat. I also learned that Testors gloss lacquer can easily come off Testors gloss enamel.  They are not compatible.  Don't do it.

Weathering is by airbrush, drybrush, and pan pastels.  This is a very basic job...maybe 30 minutes worth, trying to match photos I had.

The interior is a photo my dad uses for these types of engines.  Also an MTH engineer figure was heavily mutilated to fit into the cab. It was so time-consuming, the fireman side only has the photo glued to the motor-shield.

I have been working on a temporary photobooth of sorts on my new workbench...however I really need to work on my lighting as you will see.  I have a diorama planned to replace this...but that will take time.

As a side note, good luck finding SCL locomotive decals.  I think I dried up the last pond.

Enjoy.


Sunday, November 15, 2015

Modeling: So, are Lionel's new scale 21" cars worth converting to 2R?

Since the announcement of these 21" cars by Lionel, I've been eyeing them and hoping they would be accurate enough to use for my Southern train.  As seen by my earlier preliminary post, the cars they decided to do were a hodgepodge of mixed ancestry and somewhat unique cars that I knew they'd never get right.

I finally had the chance to see the tooling up close at Fall York 2015.  After learning that the first 4 sets of cars are all based off of NYC-Empire State Express tooling, I then decided to see if it was worth re-using the ends, interior, underframe, etc. to make my own cars using Union Station Product Styrene sides. Below are my photos, analysis, and my decision...


Really nicely done ends.  They come in full-width and non-full-width. Off to a good start.


Here is a general image of how the fluting looks to be more or less correct, including the skirting. This particular car has windows that use up the entire gap between the fluting.  Southern (and also other roads) had cars that had slightly smaller windows.


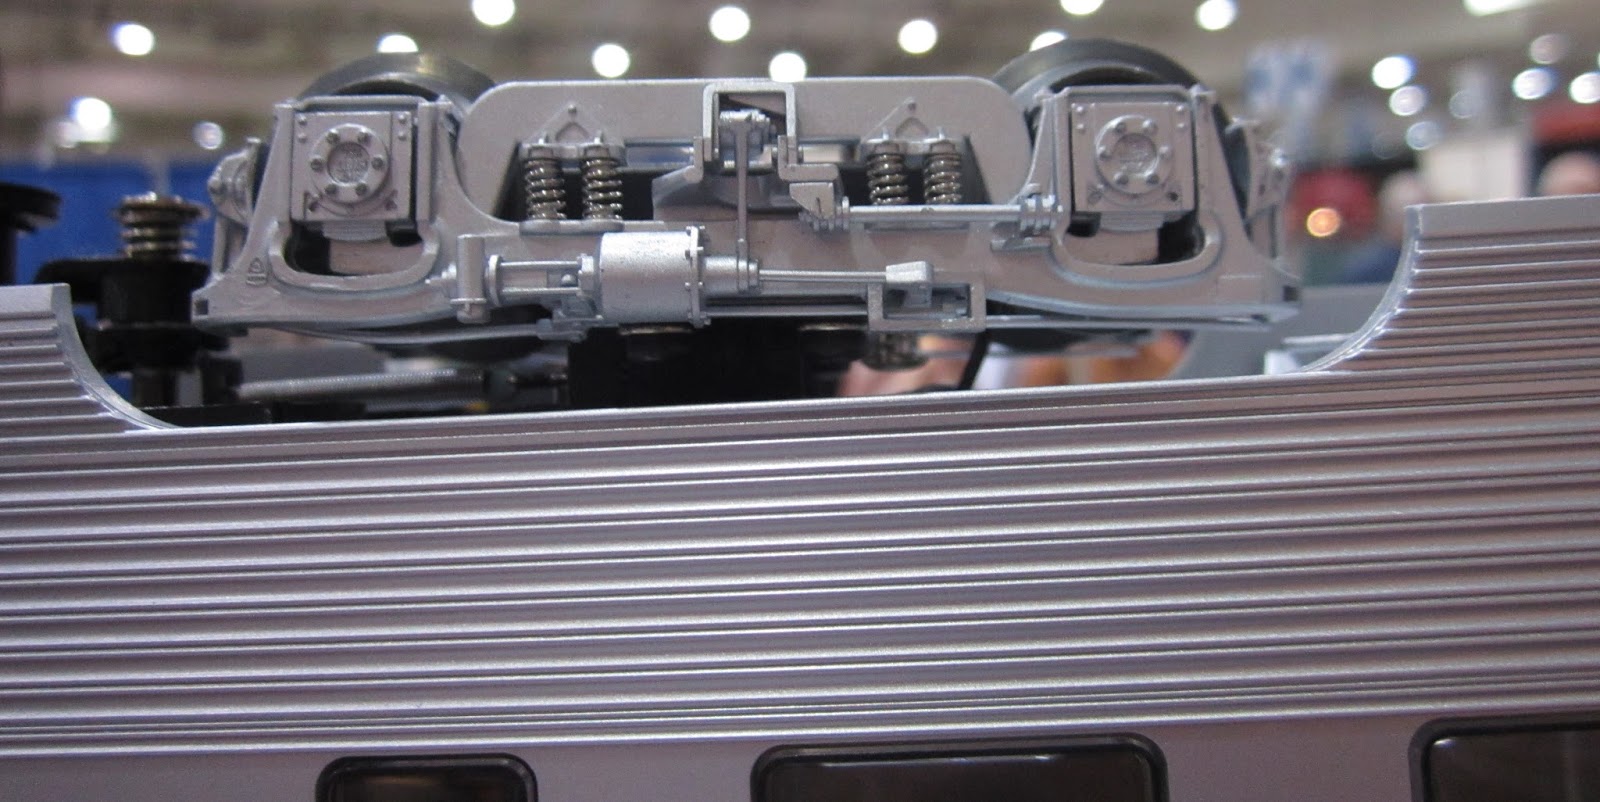
Between the above three photos, you can see really nice trucks.  However you also should be able to see that the cars sit extremely high on their trucks.  Maybe .25"? I have a feeling this is going to be the biggest flaw in the release of these cars besides every car being an NYC-prototype. IMHO, it looks just as bad as putting the windows on from the outside...what a joke.  For brand new tooling, I can't believe mistakes (or some may call them concessions) like this are being made. The Lionel product manager said he was working to correct this ride height issue on newer releases, but those buying the initial product are stuck with this design.

Personally, Lionel is making brand new tooling...I can't believe the kinds of mistakes (not really concessions IMO) they're making on these cars. They're trying to sell to an audience that cares about this kind of stuff...they shouldn't be able to get away with these kinds of mistakes.  They fix the windows and screw up the ride height.  I don't want the cars to hurt Lionel financially, but they're doing an injustice to consumers, but since the cars come in an orange box, I bet modelers will just eat them up regardless.  It's a shame because Lionel obviously has a talented staff that can make the rest of the car look really amazing, yet someone screwed up on something really obvious.


Since I would have to swap wheels for 2R wheels anyway, I went to investigate if I could fix the height issue.  I think it is possible.  See the two screws on the inside of the truck?  There are 2 more on the other side and these hold the truck to a bolster that I believe could be replaced with a brass piece that would allow the trucks to sit lower.  However, the way Lionel did their couplers, I think this will be difficult unless modelers go to Kadee couplers...


They're using those Kinematic couplers again.  Nice design except for the spring that you can easily see in the center.  The problem is that it uses the entire space and appears to be the reason why the cars are so highwater.  Again, I think if folks can afford to go to kadees on these, they might be ok.  (Even if you truck-mount the kadees...since you're going to have to make new mounts anyway to fix the ride height issue.)


Again, windows, fluting, all done really nice.  However, Lionel likes to use these giant rivets in alot of their cars. (PS-4 flats, 40' flats, boxcar running boards, etc.) The letterboards have these unsightly and unprototypical rivets on them. I assume it makes them more durable over time, but I don't get why they just don't glue them on.  It matches the prototype better, can be repaired if they do fall off at some point.


So here's more on the windows.  They're flush mounted and have the black gaskets.  They look extremely good on these cars.  What a shame they don't make accurate sides for every road name.  The guy at Lionel said they were going to have accurate sides as much as they could moving forward, especially for the UP (excursion?) train coming out soon. There may be some other designs that will come along over time...ok cool, but doesn't help me here.

A shot of the observation car.  Nothing really to complaint about, but since its not a blunt-end observation car, they should have went ahead and added a scale coupler here to make it look better...just like they put on the front of some of their top of the line steam engines.


To be honest, I'm not a passenger car underframe expert.  There is a lot of random compressors, condensers, battery boxes, etc. and I don't really know what's correct, though I could sit with some of my books and start pointing out whats right and wrong. I will start to learn though...Rapido Trains has a good page on this stuff: http://rapidotrains.com/budddetail.html I bet some think the same when it comes to window/door arrangements, fluting, etc. on the rest of these cars, but those are spotting features, which are features that make a particular car, loco, etc. unique and distinguishable from another besides their reporting marks. While the majority of these underframe items face the track, they can still be seen when looking at the cars from the side, and sometimes count as part of those spotting features.  In any case, these cars look to be really nice and even have a switch to turn the LED lighting on and off.

I don't have any photo's of the interior, but the interiors looked really nice when I asked Mike Reagan to open a car so I could see inside.  However, they will come unpainted and without passengers.  Not a deal breaker to me, but that could be quite a bit of work to some of those out there who want that to be done already.  The LED lighting already set up inside was a plus to me, but I can make my own pretty easily.

I also think the paint they're using matches the prototype relatively well.  No complaints there, but since I'd have to redo the sides, I didn't care that much.


So...considering street price at about $100/car to just reuse the bare bones and with what I've seen, I am not going to buy these for that purpose.  I think fixing the ride height is a lot more work than its worth.  I would paying for a lot of things that I can't reuse (Lionel won't sell interiors, so I can't even mix and match interiors to get close enough patterns), and probably couldn't resell for very much.  This leaving me some options, in order of preference:
  1. Continue to badger 3rd Rail to make a Southern Crescent.  I think there is enough market to sell an accurate train to the market, especially after Lionel's poor cookie-cutter attempt here.
  2. Take some other secondary market 2R offerings at a cheaper price (Weaver 21" Kline 21" etc) and use those as my base to build up nice cars.
  3. Wait to see if Lionel improves their cars and use future offerings as my base.
  4. Make my own entirely from scratch...something I was hoping not to do.

To those getting these cars for the NYC ESE, congrats...they will look really nice once you fix the ride height issues, paint the interiors, and add figures, but I really think fixing the ride height consistently across a whole train is going to eat up a lot of time. I hope Lionel learns from these early 21" car mistakes and makes a product that folks want.  For the mean time, I think 3rd Rail and AtlasO still have plenty of room to continue making 21" cars, especially if they make accurate cars per railroad.

As a side note...took a look at Rapido Trains to see how detailed their cars are in comparison, how good their stainless steel looks, etc.  Sadly, O-scale still needs a Rapido-like company. They are truly the best passenger car company. (in HO and N)  For $109, these cars BLOW out anything seen in O-scale, even 3rd Rail. They pay attention to every detail...shades at different heights, painted interiors, extremely detailed underframe detail, lots of end-car details, etc.  I'd gladly pay double (O is double the size and double the price right?) These cars truly rival exquisite brass in finish and in detail.  It's a shame.  Don't believe me?  See here (Scroll down and click on images): http://rapidotrains.com/budd1.html